Hi Everyone,
This is one of the mad hatter out of the team of three "The Twisted Challenges" team. We are a monthly challenge blog with our first challenge this month.

For our opening challenge we have florals as the theme..... but wait......did you think we would keep it as simple as that for you? Well no, we love challenges and hence we decided to add a twist to it.

For our opening challenge we have florals as the theme..... but wait......did you think we would keep it as simple as that for you? Well no, we love challenges and hence we decided to add a twist to it.
Theme for the month of June 2018 is :
So what kind of projects can you create...You can create anything...yes anything! No restrictions on what you create as far as you stay true to the theme and follow the rules of The Twisted Challenges
As a part of my Inspiration for the Challenge I have created two projects with two different techniques. Please also note that both the cards are aimed at men! One for a nephew who recently did extremely well in his 12th Boards and another one for my dearest Father on the occasion of Father's Day. Who said Floral cards were not for men....both the men in question love flowers and the addition of checks surely gave the masculine touch to it.
Project 1:
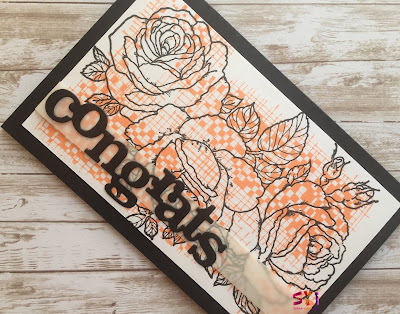
This is a simple card using the technique of layered stamping.
I
have used a Kaisercraft Mini Background Stamp-Arty to create the checks
on a white cardstock with the help of Catherine Pooler Ink and over
that stamped a layer of Watercolor Roses from Hot Off The Press Stamps
using the Versafine Onyx Black Ink.
I have die cut the sentiment "Congrats" from Winnie and Walter dies and adhered it to a strip of vellum. The strip of vellum allows me to give depth to the card along with maintaining the focus at the sentiment and yet allowing the stamped design to peep through the translucent sheet.
Project 2:
This card showcases the double stenciling technique.
Step 1:
I have taken the Craftreat Layered Rose Stencil and with the help of a washi tape attached it over my white cardstock. I then traced the design with a pencil.
Step 2:
I then layered my Memory Box Texture Mesh stencil over the first Craftreat stencil.
Step 3:
With the help of Inks of my choice and daubers I starting dabbing over the Texture Mesh Stencil. Due to the rose stencil being below the texture mesh stencil, the inks created checkered patterns in the shape of the flower.
Step 4:
I then created the leaves around it in the same way following the steps 1 to 3.
Step 5:
Using my 0.2 Black Uni Pin Fine line Mitsubishi Pen, I retraced the outline I had made with the pencil.
Step 6:
I have then layered the colored cardstock (Craftreat Double Sided Cardstock) and pattern paper (Papericious) as per desire to create the card.
Step 7:
To complete the card, I stamped the sentiment on a black cardstock using Versamark Ink and heat embossed it with CTMH Gold Embossing Powder.
I hope you like my inspiration. Please do not forget to visit the The Twisted Challenge blog to see what the other two team members have created and leave some love for them in the comment section.
Also share your own creations in the Blue Linky tool provided at the end of the challenge blog. You could win a goody bag from our sponsor ...so what are you waiting for....grab your supplies and show us your crazy ideas on this month's challenge theme at The Twisted Challenge Blog
Lots of Love and Happy Crafting
Saumya


3 comments:
Beautiful cards as always Saumya. I love how you have used layering techniques with stencil and stamps for the cards. Thanks for sharing step by step images with us. Its so great to be doing the challenge blog with you. Cheers to more crafty fun :)
I absolutely love your cards Saumya. I love how you have used layering of stencils and stamps to create the beautiful card inspirations. :) So honored to be sharing this journey with you over at TTC. Cheers to more crafting together
Such a creative way to make checkered flowers Saumya...definitely out of the box!
Cheers
Dr Sonia
Post a Comment